Getting started
Create, open and save your projects.
- New project Ctrl N
- Give it a name, pick a ready-made size (48 × 48, 64 × 76, 100 × 100) or enter the width and height in stitches (up to 512; above 256 the project switches to format 10 and won’t open in older versions of stixiva). Set the fabric (Aida or linen), its count, its color and the margin, then “Create project”.
- Open Ctrl O
- In the browser, opens an .embx, .oxs or .wxs file saved on your device (8 MB max); for .oxs or .wxs files, a report lists anything that couldn’t be brought over. An .svg drawing is converted into backstitch. In the Windows app, “Open” reads .embx files only: a .wxs goes through “Import WXS”, an .svg through the Blackwork tool (“Import an SVG drawing…”), and an .oxs opens from the studio in the browser.
- Import WXS
- Brings in a file made with Super Point de Croix Deluxe (.wxs).
- Save Ctrl S
- In the browser, downloads your project as an .embx file. In the Windows app, “Save as” (Ctrl Shift S) also lets you choose where.
- My Cloud Projects
- An optional space to open your projects on another device. The first upload happens when you decide (“Save current project”); after that, the open project updates there automatically and receives changes made on your other devices. If there’s a conflict, nothing is overwritten: you choose which version to keep in “Cloud space”.
- Project tabs
- Up to 8 projects open at once, each in its own tab.
Backup copy. With every change, the studio keeps a recovery copy in your browser (“Local recovery up to date” at the bottom of the screen). It doesn’t replace saving as .embx.
Drawing & stitches
The vertical toolbar, left of the chart.
Simple mode and Pro mode. The studio opens in Simple mode. Bézier path, Triangle, Diamond, Blackwork, Edit backstitch and Zoom to area only show in the toolbar once “Pro mode” is switched on at the top of the studio (not on phones); their keyboard shortcuts work in both modes.
- Selection V
- Frames an area to copy, move or transform.
- Lasso Q
- Selects a freehand area.
- Draw B
- Places stitches with the active floss, stitch type and strands.
- Bézier path P
- Draws a curve point by point. Enter confirms, Backspace removes the last point.
- Eraser E
- Erases stitches. “Active type only” option to erase just one stitch type.
- Line L
- An even run of stitches between two squares.
- Rectangle R
- Outline or “Filled shape”. Shift for a square.
- Circle / Ellipse O
- Outline or filled shape. Shift for a circle.
- Triangle T
- Outline or filled shape.
- Diamond D
- Outline or filled shape.
- Shapes J
- Heart, star, flower, snowflake or ring, outlined or filled; adjustable number of points.
- Edit backstitch N
- Drag a backstitch vertex (connected lines follow), pick a line to change its strands or floss, rotate it, flip it, enlarge it or delete it, join lines that touch.
- Fill F
- Fills a closed area with the active floss.
- Blackwork K
- Fills a closed area or the selection with a backstitch pattern; “Shaded” turns the selected cross stitches into denser or lighter patterns.
- Auto outline U
- One click traces the edge of a same-color area in backstitch, holes included, in the active color; Shift + click outlines every area of that color.
- Eyedropper I
- Picks up the floss of an existing stitch.
- Pan the fabric H
- Drags the view without changing the project. Also: Space + drag.
- Move the design M
- Moves the stitches drawn on the fabric.
- Zoom to area Z
- Frame the part to enlarge.
Stitch types
In Pro mode, the “Stitches” bar offers 21 types: cross stitch, half stitch, half cross, quarter and three-quarter stitches, petit point, running stitch and back running stitch, upright and horizontal cross, backstitch (spaced, tight or free, single or double thread) and knots (tight or spaced), plus beads (a project with beads switches to format 10). Alongside: Direction, Size (1 to 4) and Strands (1 to 6). In Simple mode, the top bar offers seven common stitches (cross, half cross, quarter, three-quarter, backstitch, knot and bead) and 1 to 3 strands.
Text, motifs and fabric size
- Cross-stitch text (5 × 7 alphabet) or TrueType font text.
- Insert a motif : heart, star, tulip, border.
- Fabric size : enlarge or shrink the chart by choosing the anchor point.
Tip: dragging with the right mouse button erases, whatever drawing tool is active.
Colors & floss
The “Floss box” panel on the right, and its windows.
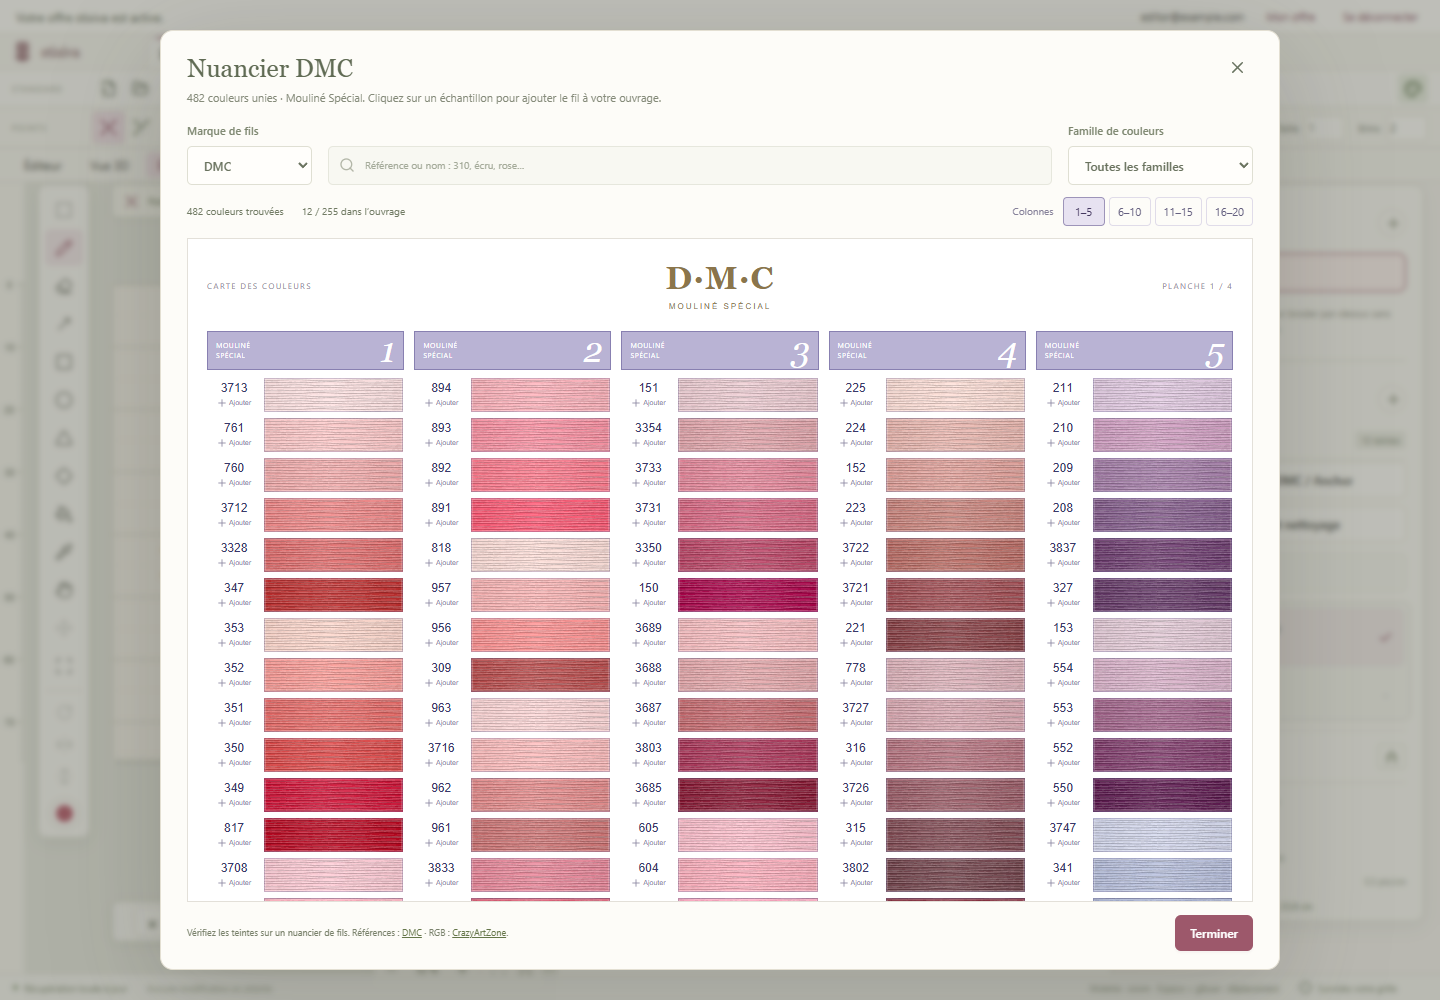
- Floss color charts
- 482 DMC colors, 444 Anchor, 369 Madeira and 489 Sullivans. Search by number or name, filter by color family, click a swatch to add it to the project (255 colors max). On hover, the matches printed by Madeira and Sullivans.
- Switch brands
- Moves the whole project to another brand: each color takes the maker’s official match when the colors agree, otherwise the closest floss on screen, and two colors never get the same number. Check everything before applying, and undo it in one go.
- A new color
- Adds a custom color with its name and display color.
- Replace a color
- Swaps every stitch of one floss for another; the old floss can be removed from the palette to merge them.
- The floss box
- The list of floss colors in the project with the stitch count for each, a “Find a color…” search, stitch and color totals.
- My floss stash
- The floss you own, the shopping list (printable), the colors of the current project with estimated skeins (8 m, 10 m for Madeira), and conversions between brands. CSV export.
- Isolate the active color
- In the display settings: highlights only the stitches of the selected floss.
Screen colors are approximate: always check your colors against a real floss color card.
Photo to pattern & cleanup
Turn a picture into a chart, then make it a pleasure to stitch.
- Image to pattern
- PNG, JPEG or WebP, up to 20 MB and 16 million pixels; the image is processed on your device. Set the size (1 to 256 stitches a side), the fabric, the starting palette (image colors, DMC, Anchor, Madeira or Sullivans) and the maximum number of colors (2 to 64). Then “Create chart”.
- Image settings
- Crop, rotate 90°, brightness and contrast, forced or excluded colors, transparent areas, pixel art mode, and “Gradient dithering” (none, for crisp edges, or ordered, for softer transitions).
- Reference image
- Shows the source image under the chart, with adjustable opacity, for hand retouching.
Palette and cleanup
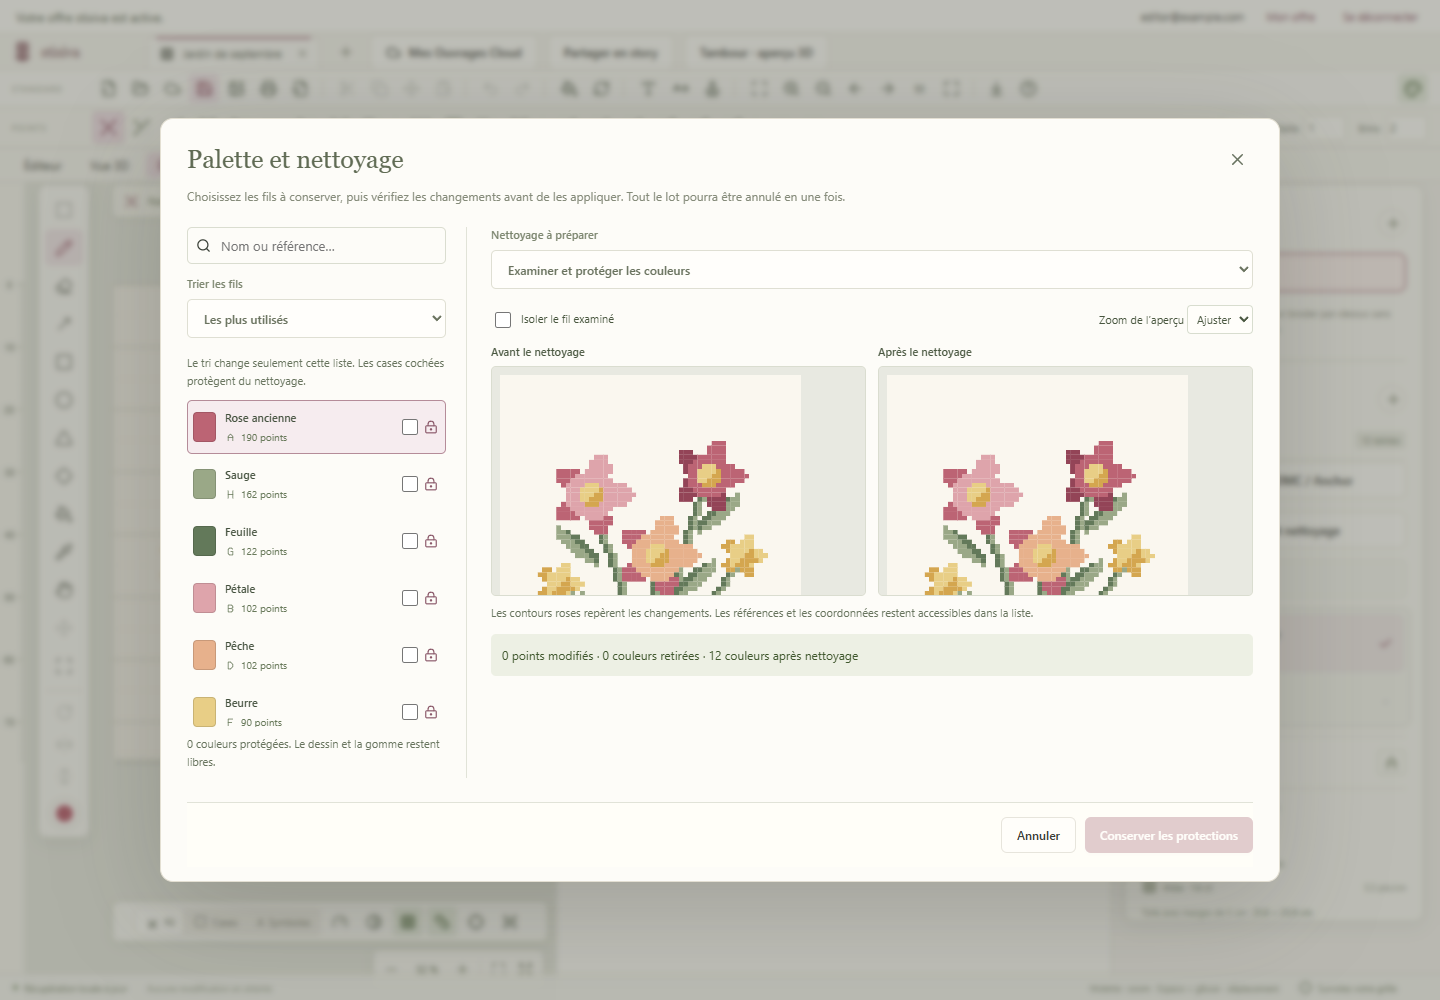
- Review isolated stitches : finds stitches with no same-color neighbor (“confetti”) so you can merge them.
- Review and protect colors : tick the padlock on the shades to leave alone.
- Replace or merge a color and Remove unused colors.
A before / after preview shows before you apply. The whole cleanup is undone in one go with Ctrl Z.
Layers & selection
- Layers
- Up to 32 layers to stitch over a background without changing it: show or hide, lock, move up or down, rename, delete. The base layer always stays visible.
- Selection V · Select all Ctrl A
- Frame an area; Esc cancels the selection, Delete clears its content.
- Cut, copy, paste Ctrl X Ctrl C Ctrl V
- Click to drop the paste. You can paste into another open project.
- Move selection M
- Drag the selected content.
- Rotate 90°, Flip horizontal, Flip vertical
- Transform the active selection.
Hoop & round designs
- Hoop · 3D preview
- Choose a round or oval hoop (2 to 20 in, with 4 to 12 in sizes ready to use) and its finish. Angle the preview with “Tilt”, “Rotation” and “Zoom”. The studio shows which stitches fall outside the hoop.
- Hoop chart
- A flat view of the gridded design inside the hoop opening, saved with “Download SVG chart”.
- New hoop chart
- Creates a blank project the size of the chosen hoop, so you draw at the right size from the start.
- 3D view · Split screen
- Keep the chart and the hoop preview side by side, updated as you draw.
Round designs. In “A new project”, choose “Circular project (round hoop, mandala, wreath)”: stitches outside the circle are ignored (“Limit to circle”). “Radial symmetry” repeats each stitch around the center; on an oval hoop, it becomes 2 or 4 mirror axes.
Export & print
- PDF pattern · Print Ctrl P
- Letter, A4 or A3, orientation, square size (3 to 6 mm), overlap between sheets, black symbols or symbols on color, outlines and decorative stitches. “Prepare PDF” shows the pages, then “Download PDF”.
- Download the designer package
- A ZIP file with the PDF, the chart as SVG and a publishing sheet.
- Export SVG
- The chart and its key as a vector image.
- Share as a story
- A vertical image (1080 × 1920) of your creation, with a title and message, to download or share.
Tracking apps. The PDF pattern is a vector file with symbols and a floss key, made to be read by tracking apps such as Pattern Keeper. Testing with Pattern Keeper is still in progress: check the import on your first pattern.
Keyboard shortcuts
On a Mac, Cmd replaces Ctrl. Shortcuts are inactive while a window is open or while you type text.
| Keys | Action |
|---|---|
| Ctrl Z | Undo |
| Ctrl Shift Z or Ctrl Y | Redo |
| Ctrl N | New project |
| Ctrl O | Open a file |
| Ctrl S | Save |
| Ctrl Shift S | Save as (Windows app) |
| Ctrl P | PDF pattern / print |
| Ctrl A | Select all |
| Ctrl C · Ctrl X · Ctrl V | Copy · Cut · Paste |
| Delete or Backspace | Clear the selection’s content |
| Esc | Cancel the current selection or paste |
| G | Show or hide the grid |
| + · − | Zoom in · out |
| 0 | Fit the project to the window |
| 1 | Actual size (100%) |
| Ctrl K | Command palette: type a few letters (“pdf”, “border”) to launch a tool or an action |
| F1 | Help |
Tools
| Key | Tool |
|---|---|
| V | Selection |
| Q | Lasso |
| B | Draw |
| P | Bézier path |
| E | Eraser |
| L | Line |
| R | Rectangle |
| O | Circle / Ellipse |
| T | Triangle |
| D | Diamond |
| J | Shapes (heart, star, flower, snowflake, ring) |
| N | Edit backstitch |
| F | Fill |
| K | Blackwork |
| U | Auto outline |
| I | Eyedropper |
| H | Pan the fabric |
| M | Move the design / the selection |
| Z | Zoom to area |
On the chart
- Space + drag, or middle click: pan the view.
- Wheel: zoom · Shift + wheel: horizontal scroll.
- Arrow keys: move the square cursor · Enter : apply the tool.
- Shift while drawing: perfect square or circle.
- Right click + drag: erase.
What’s new
Recently added to the studio.
- New Stitch mode Mark stitched squares on a tablet or phone, highlight a floss color and track your progress, even offline once the studio has been opened on the device.
- New Digitize a paper chart In “Image to pattern”: a photo, scan or PDF page of a symbol pattern, read square by square into full cross stitches.
- New Variegated floss Store-bought variegated floss and your own blends, right in the palette.
- New Tutorial A daily exercise to learn the studio, one tool at a time.
Ready to try it?
The studio is in public beta: full access for free, no credit card. Its interface speaks French for now; English is on its way.